This guide compiles training session notes by SWK Technologies’ consultant team for Acumatica, demonstrating administrator and user level functionality for System Management, User Security and other modules within the ERP. This walkthrough details various configuration settings and steps for tailoring email preferences, security and access controls, role-based dashboards and other features available in most versions of Acumatica Cloud ERP. Building upon earlier training that covered navigation tips for the user interface (UI) and related settings in Acumatica, this session dove deeper into specific configurations at the administration level that impact user characteristics and workflows:
Email Management
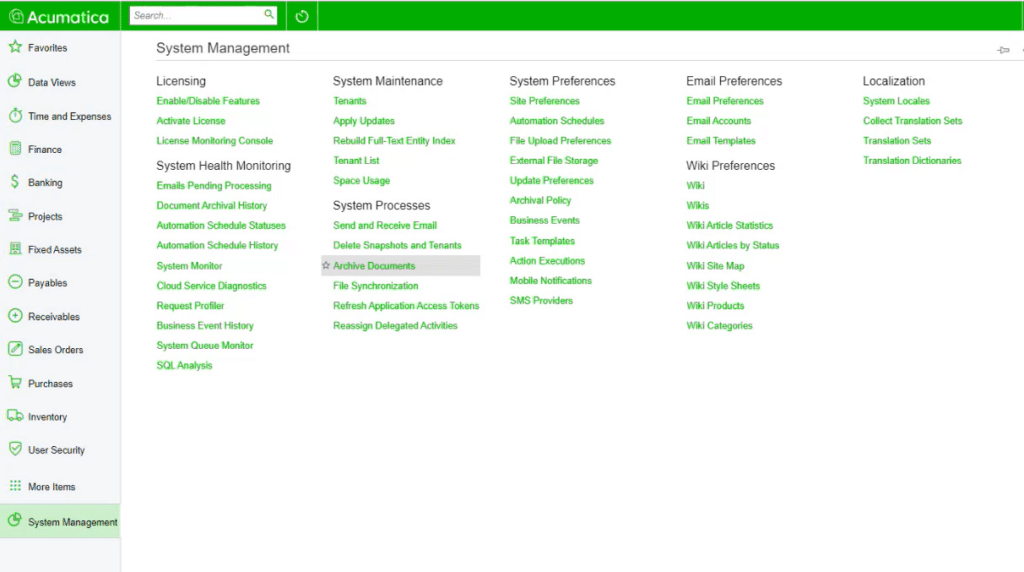
Most email configuration settings in Acumatica reside within the System Management module. These workflows can be automated at the admin level, with the system is designed to monitor itself once properly configured and activated.
Setting Up Email Preferences
Email preferences define which templates the system uses for different functions. For example, the “User Welcome” template sends notifications when new users are activated. Each preference links to a corresponding template containing the email content.
Managing Email Templates
Each template contains:
- A subject line
- The email body
- Wildcard fields that dynamically insert data (such as company name, user details)
To view existing templates:
- Navigate to System Management
- Select Email Templates
- Browse the list of available templates
- Click on any template to view its content
Tip: When creating new templates, consider using a company identifier prefix (such as “SWK-“) in the template name to distinguish custom templates from system defaults.
Scheduling Email Processing
The email system requires a schedule to process outgoing messages:
- Access the automation schedule for email processing
- Verify the schedule is set to activate at the appropriate time
- Configure the frequency (typically every 5 minutes)
- Ensure the process is set to “Send everything”
For live production environments, this schedule should be active. During implementation, it typically remains inactive until go-live.
Monitoring Email Status
Administrators can track email status through two primary screens:
- Emails Pending Processing: Shows messages waiting to be sent
- All Emails: Provides a comprehensive history of sent, received, and failed messages
Security Management
Security management in Acumatica involves multiple layers, from password policies to role-based access controls.
Configuring Security Preferences
The security preferences screen controls password requirements and account lockout policies:
- Minimum password length (typically 8 characters)
- Password expiration settings
- Account lockout after failed attempts (default: 3 attempts)
- Lockout duration (default: 15 minutes)
- Lockout counter reset time (default: 10 minutes)
User Management
When creating new users, administrators should:
- Use consistent naming conventions (first initial + last name is common)
- Link users to employee records
- Set appropriate email addresses
- Assign the appropriate roles
- Set the default homepage dashboard
The user profile also displays timelines such as creation date, last login time and password change history.
An important administrative capability is “Sign in as user,” which allows administrators to test access rights by experiencing the system from a user’s perspective. This function is accessible from the user management screen for administrators with appropriate permissions.
Tip: SWK recommends setting new users with a standard password (“welcome 123”) and checking “Force user to change password on next login” to ensure passwords are changed for each user from what the admin sets as the default.
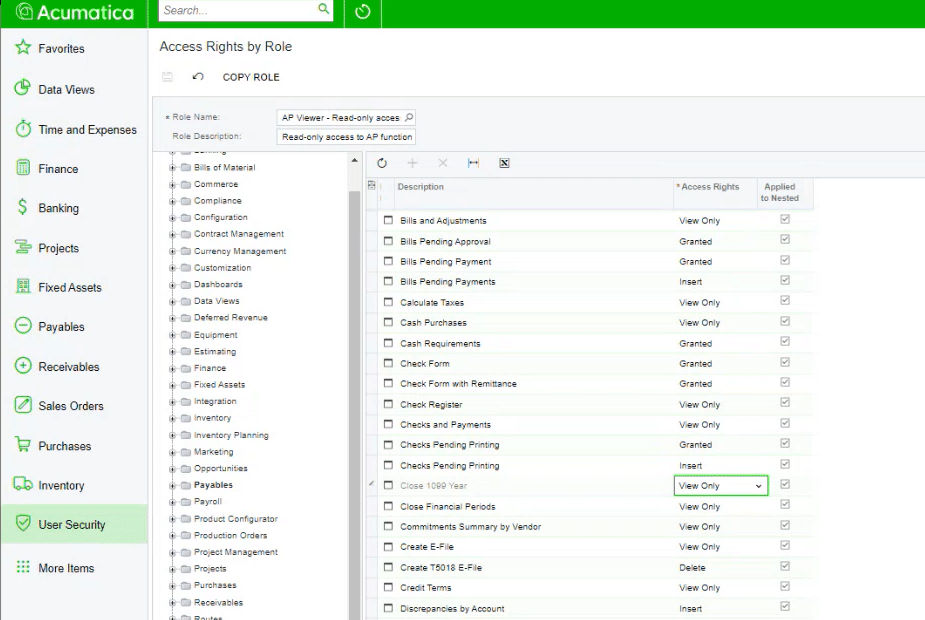
Role-Based Access Control
Acumatica uses roles to manage access rights. The system includes predefined roles such as AP Admin, AP Clerk and AP Viewer, with access levels decreasing in that order.
Access rights levels include:
- Not set: No explicit right defined
- Revoked: Explicitly denied access
- View only: Read-only access
- Edit: Can modify existing records
- Insert: Can add new records
- Delete: Complete control (includes all other rights)
To view which users have a specific role:
- Navigate to User Roles
- Select the role
- View the list of assigned users
Tip: SWK recommends not deleting roles unless necessary, as these have little to no impact on the rest of the system.
Branch / Company Security
Organizations with multiple branches can restrict user access to specific branches:
- Create a role for each branch (e.g., “North”)
- Configure the branch’s access control to require that role
- Assign the role to appropriate users
Dashboard Configuration
Dashboards provide Acumatica users with visual summaries of key data views and quick access to information relevant to their user role. This training covered how each functions as a user’s “homepage” in the system and the various configuration settings from the admin level down.
Dashboard Basics
To set a user’s homepage dashboard:
- Edit the user record
- Locate the Homepage field
- Select the appropriate dashboard from the list
- Save the changes
Creating and Modifying Dashboards
Dashboard designers with appropriate permissions can customize dashboards by:
- Accessing the dashboard
- Clicking the Design button
- Adding, removing, or modifying widgets
Each dashboard widget draws data from a Generic Inquiry (GI), which functions as a database query. Widgets can display data as:
- KPI tiles (with numeric values)
- Charts
- Data tables
- Page links
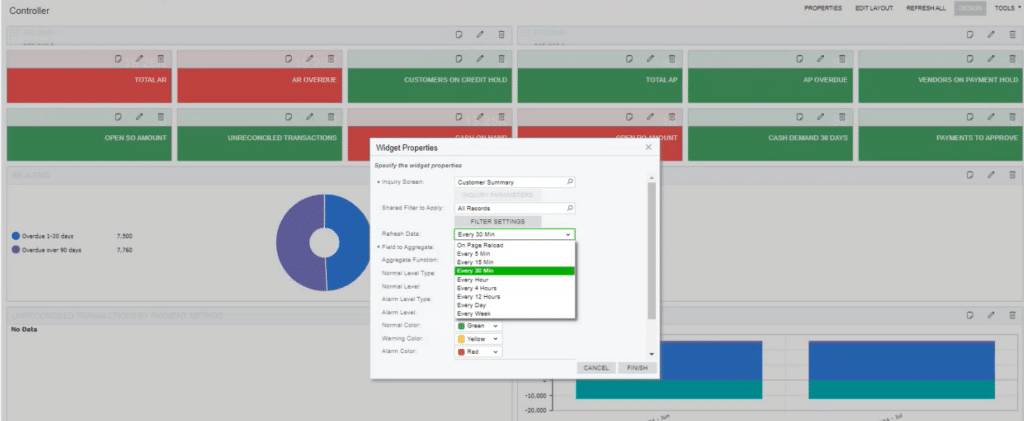
Configuring Dashboard Widgets
When configuring widgets, administrators can:
- Set data refresh intervals (e.g., every 30 minutes)
- Choose fields to display
- Select aggregation methods (sum, count, average)
- Define color-coding thresholds for visual indicators
- Configure drill-down functionality when users click on widgets
For example, to change a widget from showing the sum of past-due invoices to showing the count:
- Enter Design mode
- Edit the widget
- Change the aggregation method from “Sum” to “Count”
- Save the changes
Business Events Management
Business events trigger actions based on record changes, such as sending notifications when invoices are created.
Understanding Business Events
Business events consist of:
- An event ID
- The associated screen
- The trigger condition (e.g., record change)
- The resulting action
These events integrate with automation schedules to perform tasks automatically, reducing manual management on the individual user end.
Implementation Planning
Implementation scheduling factors were discussed during the training, highlighting how timing and data volume could affect planning and successfully migrating information from existing databases to Acumatica.
Go-Live Timing
Organizations must decide between month-end or mid-month go-live:
Month-end advantages:
- Cleaner cutoff point for financial data
- Easier reconciliation of beginning balances
- Natural business cycle break-point
Mid-month considerations:
- Requires precise data cutoff timing
- Necessitates careful balancing to ensure data integrity
- Potentially creates reconciliation challenges
Data Migration Strategy
A successful data migration requires:
- Identifying a clear cutoff date for transactions in the legacy system
- Extracting complete and accurate data
- Verifying data integrity before and after migration
- Planning for a system blackout period when neither system is available
- Thorough validation of migrated data before resuming operations
Implementation Timeline
Implementation timelines should account for:
- Holiday weekends or other scheduling conflicts
- Staff availability for cutover activities
- Sufficient time for data verification
- Training needs for end users
Extending System Administration with Acumatica’s UI Capabilities
The personalization options available to users – such as multi-tab navigation, custom filters and mobile access – are impacted by the configurations set by your admins in Acumatica. For example, the ability to attach notes and files to transactions relies on appropriate security permissions. Similarly, the export and import functionality requires proper configuration to ensure data integrity.
The relationship between administrative settings and user interface functionality highlights the importance of comprehensive training for both administrators and end users. When both groups understand their capabilities in the system, organizations can leverage Acumatica to its fullest potential.
Discover More Tips and Tricks for Acumatica Cloud ERP
SWK Technologies will help you get the most out of your ERP investment, leveraging our deep technological and industry knowledge as a top Acumatica VAR partner and Community resource. Check out some of our Acumatica videos and other educational resources, and reach out to us when you’re ready to learn more tips and tricks to maximize your value return on your software.
Contact SWK here to gain access to more Acumatica tips, tricks, updates, and tailored demos.