Joel Gress
VP of Product Marketing – Acumatica
SWK Technologies, Inc.
Need to be able to scan and print files from your ERP? This step-by-step guide will walk you through exactly how to add a scanner to your Acumatica software with a feature available since version 2019 R2, DeviceHub. This article will show you how to get set up, configure your settings properly, and efficiently run scans without leaving your Acumatica Cloud ERP menu.
Things to Know Before you Start
- Select a scanner that provides a TWAIN device driver. TWAIN is an application programming interface (API) that lets applications like Acumatica interface directly with the scanner. This is required to interface the document scanner with Acumatica.
- DeviceHub is a Windows application that must be installed on the local computer. DeviceHub manages the interface between the hardware devices (document scanners, printers, and scales) and Acumatica. DeviceHub can be installed using the Acumatica ERP Tools download or the Acumatica installation package. See install Acumatica ERP Tools
- The software that comes with your scanner may not include the TWAIN driver. Often times you need to download the TWAIN driver separately.
- Installing the software that comes with the scanner for document management may interfere with the TWAIN driver. I recommend installing only the TWAIN driver and completing your setup before introducing additional scanner software.
- The DeviceHub uses an Acumatica API session. This is a licensing consideration for companies with multiple API integrations.
- DeviceHub must be running on the local workstation that the scanner is attached to. You may want to add DeviceHub to your Windows startUp folder.
To Add Scanners via DeviceHub for Acumatica ERP
DeviceHub is a Windows application to which Acumatica ERP sends push notifications when a print or scan job is requested. As the name implies, it facilitates the digital connection(s) between your enterprise system and certain hardware devices, including scanners, printers and scales. This walkthrough will cover each step for installing, setting up and configuring the app to be able to utilize it to execute scan jobs specifically.
Setup DeviceHub
To add a scanner or multiple scanners via Device Hub, do the following:
- Install Scanner (see hardware specific instructions) and TWAIN driver
- Install DeviceHub
- Configure DeviceHub
- Update devices in Acumatica through the device appropriate screen (Printers, Scanners, Scales)
- Scan documents
Installing DeviceHub
- Download the Acumatica ERP installation file or AcumaticaTools.msi for your version/build of Acumatica from the Acumatica Community Portal
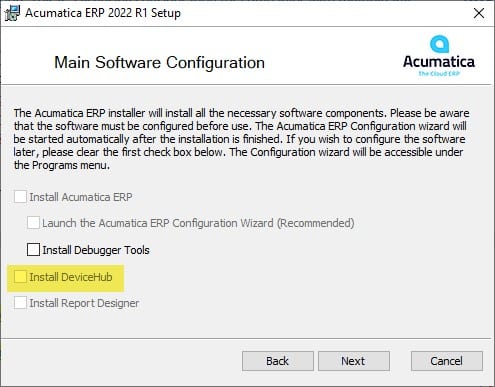
- Run the installation Wizard.
- On the splash screen select DeviceHub
- You must install Scanner manufacturer specific driver (supporting TWAIN) on the Windows computer hosting DeviceHub.
Configuring DeviceHub
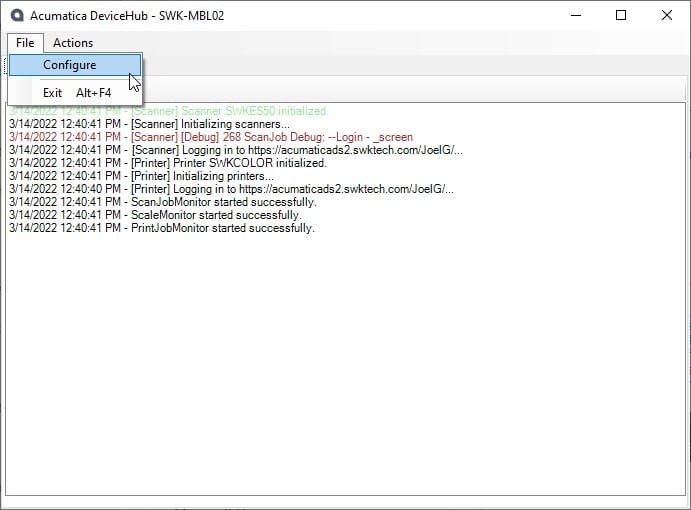
- Launch DeviceHub
- Click File | Configure
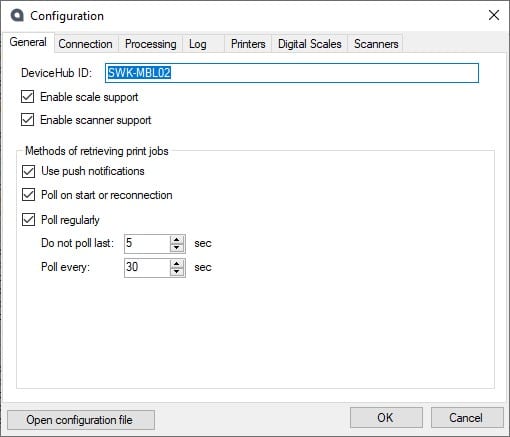
- Configuration | General
- Input a unique DeviceHub ID. This value will be visible inside Acumatica and used to identify the connected computer. Consider using the Computer name or the User Id for the owner of the workstation.
- Click the box to Enable Scanner Support
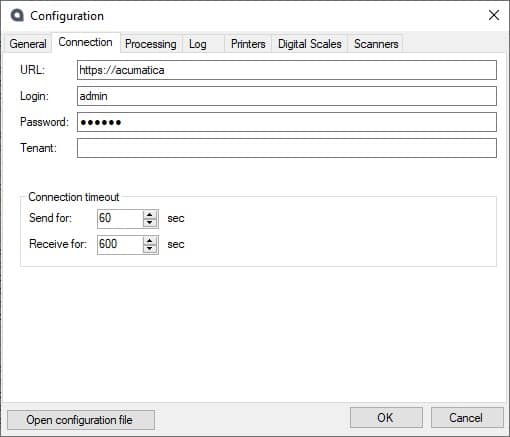
- Connections
- Input URL for your Acumatica instance
- Input login for DeviceHub users (note: in a production environment we often setup an Acumatica user named DeviceHub)
- Input the user password
- Tenant – only required if you have multiple tenants setup in your Acumatica instance
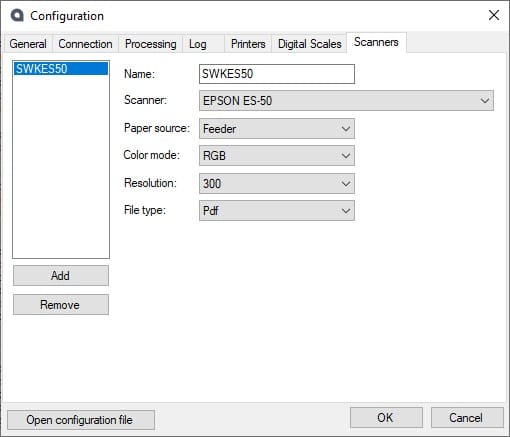
- Scanners
- Click Add
- Input Name you wish to use for the device (note: consider prefixing the device name with a user id to easily distinguish the device by user)
- Click the Scanner drop down to select the scanner you previously setup on your workstation
- Select the Feeder, Color Mode and Resolution. (Note: black and white images are smaller in size and resolution of 300 DPI is sufficient)
- File Type
- Image – one image per page
- PDF – one PDF for all pages (MOST COMMON SELECTION)
- Image/PDF – one image file for single page scans and PDF for multi-page scans
- Name: Enter the name of the Scanner. (Use digits and uppercase letters. Other characters are not supported.)
- Scanner: From the drop-down list, select one of the scanners detected in the system.
- Paper Source: From the drop-down, select Glass OR Feeder OR Duplex.
- Pixel Type: From the drop-down, select one of the supported Pixel Type
- Resolution: From the drop-down, select one of the supported Resolution (dynamically listed for selected scanner)
- File Type: From the drop-down, select one of the supported File Type.
- Image ➔ In case of multiple pages, each page will be a separate image
- PDF ➔ A single PDF for all pages
- Image/PDF (PDF in Case of Multipage) ➔ Image file in case of single page else single PDF for all pages.
Click OK to close the Configuration window.
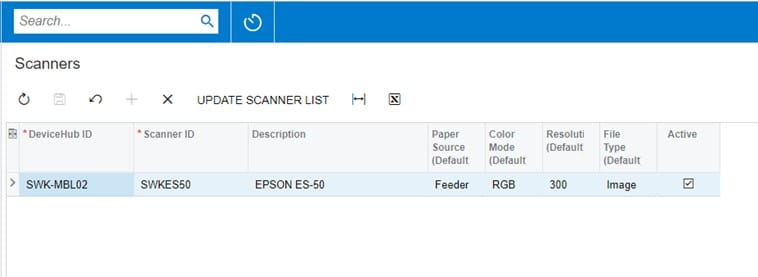
Update Scanners
Sign into the Acumatica ERP instance for which you have configured DeviceHub.
On the System tab, click Management. In the left pane, navigate to Manage> Scanners (SM206540).
On the form tool bar, click Update Scanner List to retrieve the list of Scanners from DeviceHub.
Refresh the form.
To Specify Default Scanner for Selection
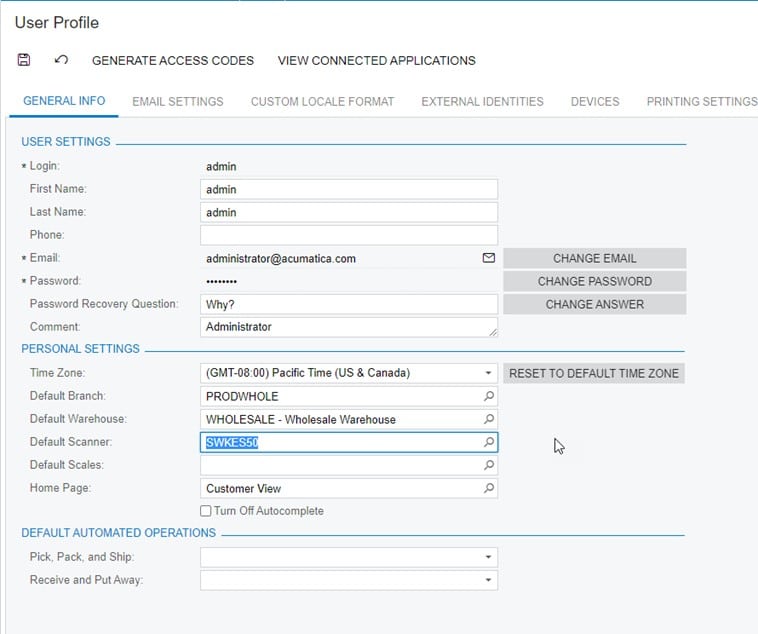
You use the User Profile (SM203010) form to specify the default Scanner of a current user account. Proceed as follows:
In the Info area, click your username and select User Profile or My Profile, depending on whether you are using the classic UI or modern UI.
In the Personal Settings section of the General Info tab, select the Scanner in the Default Scanner box.
Save your changes.
Sending Scan Request
- Make sure DeviceHub is running
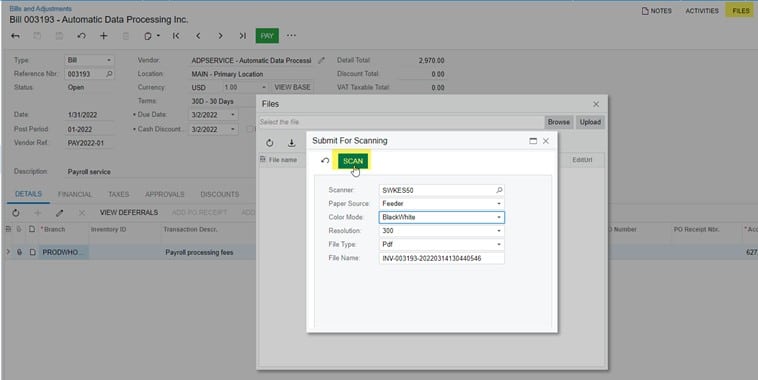
- Navigate to Bills and Adjustments (AP301000} screen and select the Bill to which you want to attach scanned document.
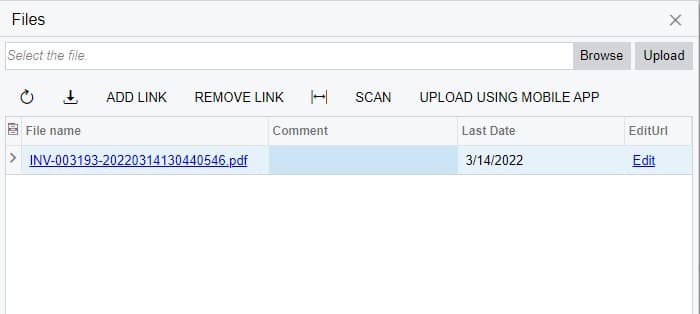
- Click on Files button,
- Click on Scan button, you will be prompted with Scan Parameters.
- Once scanner has completed the process, Files Dialog is refreshed, and scanned document is listed can be accessed from Files
Scan support is available from all Data Entry and Data Maintenance screens via Scan Tool bar button in Files Dialog.
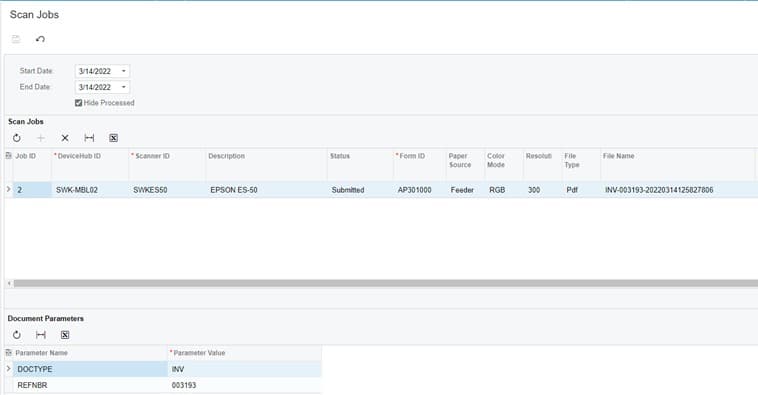
To View Scan Jobs
If the DeviceHub application is configured for use with the Acumatica ERP instance, the scan request being sent to Scanner can be viewed directly from your Acumatica Scan Job screen (SM206505).
Discover More Tips, Tricks and Other Features for Acumatica
SWK Technologies will help you get the most out of your ERP investment, leveraging our deep technological and industry knowledge as a top Acumatica partner and Community resource. Check out some of our Acumatica videos and other educational resources, and reach out to us when you’re ready to learn more tips and tricks to maximize your value return on your software.
Contact SWK here to gain access to more Acumatica tips, tricks, updates and tailored demos.
Get More Acumatica Tips & Tricks

